VIP member
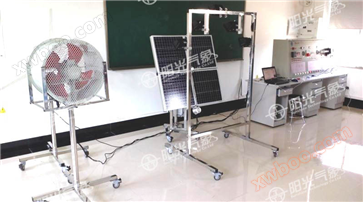
TRM-XN2 Wind Solar Complementary Power Generation Measurement and Control Training System
The application scope of the wind solar complementary power generation measurement and control training system is mainly aimed at vocational schools,
Product details
The application scope of the wind solar complementary power generation measurement and control training system is mainly aimed at vocational schools, universities, graduate students, and enterprise technicians to conduct research and training on wind power generation and solar off grid and grid connected power generation as the main topics.
1、 Main technical parameters


2、 System configuration:


2. Configuration List

3. Special note
Controller: The control switch can put the fan in a shutdown state. Before starting, please ensure that the cable is reliably connected.
Battery: The battery pack can be matched according to user needs. Before starting up, please ensure that the negative terminal of the battery pack is well grounded.
Cable: Inappropriate cables will increase power loss. It is recommended that users use the following cable specifications:

3、 Accessories details:
1. System Assembly Diagram

4、 Line connection:
(1) Operating procedures
After the installation of the wind solar complementary generator system and photovoltaic panels, and the completion of the external circuit construction, the connection and operation of the system components should be carried out safely and reliably in the following order.
1. Open the packaging to ensure that the equipment has not been damaged during transportation.
2. Connect the battery to the "BATTERY" terminal on the rear panel of the equipment using a copper core cable with a length of no more than 1 meter and an area of 6 square millimeters or more. But it is still strictly prohibited to reverse connect the battery!
3. Connect the output line of the wind turbine to the "WIND INPUT" terminal on the rear panel of the equipment.
4. Connect the solar panel to the "SOLAR INPUT" terminal on the back panel of the device.
5. Connect the load to the 'DC OUTPUT' terminal. Light controlled output loads should be connected to terminals "+" and "-1". Time controlled output loads should be connected to terminals "+" and "-2".
6. If there is a mains power switching function, connect the mains input to the "AC INPUT" on the device.
7. Turn the "switch" on the front panel to the "RUN" position to allow the wind turbine to operate normally. The "BRAKE" on the chassis is used to provide manual fan braking function. When the "switch" is in the "BRAKE" position, the fan is in a braking state.
8. 'LIGHT ADJUST' adjusts the illuminance of the light output from the street lamp. It is already set at the factory and does not need to be readjusted.
9. TIMER "can adjust the timing according to the numbers, corresponding to 1, 2, 4, and 8 hours respectively. Turn down to set.
(2) Status display
1. The 'NIGHT' indicator light is on: indicating a DC output.
2. The 'Underer VOLTAGE' indicator light is on: it indicates that the battery voltage is low and in a depleted state.
3. The 'CHARGE' indicator light is on: indicating that the fan is in a charging state.
5、 Technical parameters:

Online inquiry
-
Contacts
-
Company
-
Telephone
-
Email
-
WeChat
-
Verification Code
-
Message Content
-